MS SQL
February 3, 2010
Database Level Auditing with Microsoft SQL Server 2008
By Muthusamy Anantha Kumar aka The MAK
MAK shows us how easy it is to create a database level audit, test the audit and retrieve the audit records in Microsoft SQL Server 2008.
Creating a Server Level Audit the Easy Way," illustrated how to create a server level audit and retrieve the audit records. The next logical step is to create a database level audit. However, before creating the database level audit we need to decide where the target is going to be. Let's choose a FILE as our target for the Database level audit.
Step 1: Create a Folder
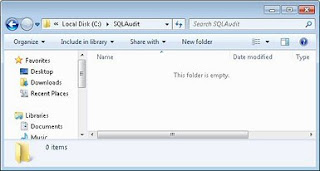
Create a folder, C:\SQLAudit, as shown in Fig 1.0.

Fig 1.0 - choose a FILE as target for the database level audit
Step2: Create the Server Audit
Create the Server Audit Object using the following command.
CREATE SERVER AUDIT Compliance_Database_Audit
TO FILE (FILEPATH='C:\SQLAudit\', MAXSIZE = 5MB,
MAX_ROLLOVER_FILES = 100, RESERVE_DISK_SPACE = ON)
Note: Compliance_Database_Audit is the name of the Server Audit. This command allocates 5MB of disk space for this audit. When the 5MB file is filled up, it automatically rolls over to another file up to a maximum number of 100 Files. When the audit restarts the next time, it evaluates the number of files and delete any older files.
Step 3: Enable the Server Audit
By default, the server audit is disabled. Enable the server audit using the following command.
ALTER SERVER AUDIT Compliance_Database_Audit with (STATE = ON)
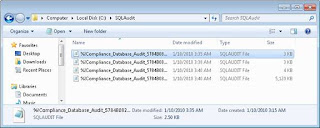
Note: Once the audit starts, the OS allocates 5MB disk space for the audit file. Refer to Fig 1.1.

Fig 1.1 - Enable the Server Audit
Step 4: Add the Database Audit specification
The database audit specification is the list of action groups that the Server Audit will audit. Let's add a couple of action groups when creating the Audit specification.
CREATE DATABASE AUDIT SPECIFICATION Compliance_Database_Audit_Spec
FOR SERVER AUDIT Compliance_Database_Audit ADD (DATABASE_ROLE_MEMBER_CHANGE_GROUP),
ADD (DATABASE_PRINCIPAL_CHANGE_GROUP),
ADD (DATABASE_PERMISSION_CHANGE_GROUP),
ADD (SCHEMA_OBJECT_PERMISSION_CHANGE_GROUP) WITH (STATE = OFF)
Note: Compliance_Database_Audit_Spec is the name of the Server Audit specification
Step 5: Update the Database Audit specification
If you want to add action groups to the existing database audit specification, you could use the following statement.
ALTER DATABASE AUDIT SPECIFICATION Compliance_Database_Audit_Spec
FOR SERVER AUDIT Compliance_Database_Audit
ADD (DATABASE_OBJECT_PERMISSION_CHANGE_GROUP)
Note: You can skip step 4 if you have already listed all of the action groups in Step 4.
Step 6: Enable Server Audit specification
Use the following command to enable Audit specification.
ALTER DATABASE AUDIT SPECIFICATION Compliance_Database_Audit_Spec
FOR SERVER AUDIT Compliance_Database_Audit WITH (STATE = ON)
Step 7: Read Audit data
Execute the following command to read the AUDIT data from the binary file. Refer to Figure 1.2.
SELECT event_time, action_id,
succeeded, session_id, session_server_principal_name, target_server_principal_name,
target_database_principal_name, database_name, database_principal_name, schema_name,
object_name, statement FROM sys.fn_get_audit_file ('C:\SQLAudit\*Compliance_Database_Audit_*.sqlaudit',default,default);

Fig 1.2 - Read Audit data
Step 8: Test Audit
We have the following action group added to the Audit specification.
DATABASE_ROLE_MEMBER_CHANGE_GROUP
DATABASE_PRINCIPAL_CHANGE_GROUP
DATABASE_PERMISSION_CHANGE_GROUP
SCHEMA_OBJECT_PERMISSION_CHANGE_GROUP
DATABASE_OBJECT_PERMISSION_CHANGE_GROUP
Let's test the action group by executing the following command.
use master
go
/****** Object: Login [MyLogin] Script Date: 01/10/2010 03:47:53 ******/
IF EXISTS (SELECT * FROM sys.server_principals WHERE name = N'MyLogin')
DROP LOGIN [MyLogin]
GO
Create Login MyLogin with password = 'P@ssWord'
go
/****** Object: Login [MyLogin2] Script Date: 01/10/2010 03:48:10 ******/
IF EXISTS (SELECT * FROM sys.server_principals WHERE name = N'MyLogin2')
DROP LOGIN [MyLogin2]
GO
Create Login MyLogin2 with password = 'P@ssWord'
go
USE [master]
GO
/****** Object: Database [MyDB] Script Date: 01/10/2010 03:48:19 ******/
IF EXISTS (SELECT name FROM sys.databases WHERE name = N'MyDB')
DROP DATABASE [MyDB]
GO
Create database MyDB
go
use MyDB
go
USE [MyDB]
GO
/****** Object: Table [dbo].[mytable] Script Date: 01/10/2010 03:48:41 ******/
IF EXISTS (SELECT * FROM sys.objects WHERE object_id = OBJECT_ID(N'[dbo].[mytable]') AND type in (N'U'))
DROP TABLE [dbo].[mytable]
GO
create table mytable (id int)
go
USE [MyDB]
GO
/****** Object: User [MyLogin] Script Date: 01/10/2010 03:48:56 ******/
IF EXISTS (SELECT * FROM sys.database_principals WHERE name = N'MyLogin')
DROP USER [MyLogin]
GO
create user MyLogin for Login MyLogin
go
USE [MyDB]
GO
/****** Object: User [MyLogin2] Script Date: 01/10/2010 03:49:13 ******/
IF EXISTS (SELECT * FROM sys.database_principals WHERE name = N'MyLogin2')
DROP USER [MyLogin2]
GO
create user MyLogin2 for Login MyLogin2
go
USE [MyDB]
GO
EXEC sp_addrolemember N'db_owner', N'MyLogin'
GO
EXEC sp_addrolemember N'db_owner', N'MyLogin2'
GO
EXEC sp_droprolemember N'db_owner', N'MyLogin2'
GO
EXEC sp_changedbowner N'MyLogin2'
GO
Now let's see if these actions have been logged to the binary file under c:\SQLAudit by executing the followoing command. Refer to Fig 1.3.
SELECT event_time, action_id,
succeeded, session_id, session_server_principal_name, target_server_principal_name,
target_database_principal_name, database_name, database_principal_name, schema_name,
object_name, statement FROM sys.fn_get_audit_file ('C:\SQLAudit\*Compliance_Database_Audit_*.sqlaudit',default,default);

Fig 1.3 - see if these actions have been logged to the binary file
Step 9: Check the Audit metadata
Use the following commands to view metadata information on the server audit and audit specification.
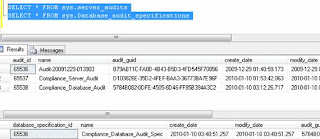
SELECT * FROM sys.server_audits
SELECT * FROM sys.Database_audit_specifications

You also check the extended events that are created by SQL server related to this audit using the following Dynamic management view command. Refer to Fig 1.5.
select s.name as [session name], se.event_name as [event name],
p.name as [package name], t.target_name as [target name]
from sys.dm_xe_sessions s
join sys.dm_xe_session_events se on s.address = se.event_session_address
join sys.dm_xe_packages p on se.event_package_guid = p.guid
join sys.dm_xe_session_targets t on s.address=t.event_session_address

Fig 1.5 - check the extended events that are created by SQL server
Step 10: Stop Server AUDIT
Server audit can be stopped using the ALTER SERVER AUDIT command a shown below.
ALTER SERVER AUDIT Compliance_Database_Audit with (STATE = OFF)
Note: When the audit is stopped, SQL Server releases the free space on the audit files to the Operating System. Refer to Fig 1.6

Fig 1.6 - Stop Server AUDIT
Conclusion
This article has illustrated how to create a database level audit, test the audit and retrieve the audit records.

